Updates On Chinese Articles by Legolas Wang

I'm obsessed with extraordinary software, and I wish to share the great experience using them to as many people as possible. 

That is why I started writing Chinese articles, to bring relatively less known applications and techniques to my home country. 

For the past three months. I have written over 45 thousand words in Chinese of articles ranging from macOS techniques to specialty app like Pixelmator Pro. Because of the high-quality articles I keep delivering, now Inadvertently, I become a part-time columnist for sspai.com. I put a link to my articles under my website's 'Chinese' section. 
 

Raw file for the video? Not Quite, It’s Called ‘Log’ by Legolas Wang

The raw format preserves more data for our photography and expands our ability to create post photo effect. But could we do the same thing for the video? Is there any video format equivalent to the raw file for the still photos?  The answer is yes. 

Based on my research, there is indeed a raw video format. However, it’s only limited to the ‘BlackMagic Design’ camera. There is an excellent article talking about that ‘raw’ format on ‘B&H Explora([Video Workflow: Using RAW Files | B&H Explora](https://www.bhphotovideo.com/explora/video/tips-and-solutions/video-workflow-using-raw-files)).’ But that’s not what I’ll discuss here. Since the ‘raw’ format for video is not universal to most DSLR cameras.  

I’ll talk about ‘log,’ which is necessarily a log curve which has been specially optimized for digital motion picture cameras to maximize the performance of the image sensor. Modern camera sensors are capable of capturing a vast amount of information. However, the existing video formats can’t support them. Our camera has to run a series algorithms to make the video meet the ITU requirement thus created a reduced dynamic range and color information. 

The Log gamma curve is designed to record and transmit as much of the information recorded by the sensor of the camera as possible. Thus, you have greater control over what color looks like in color grading process.

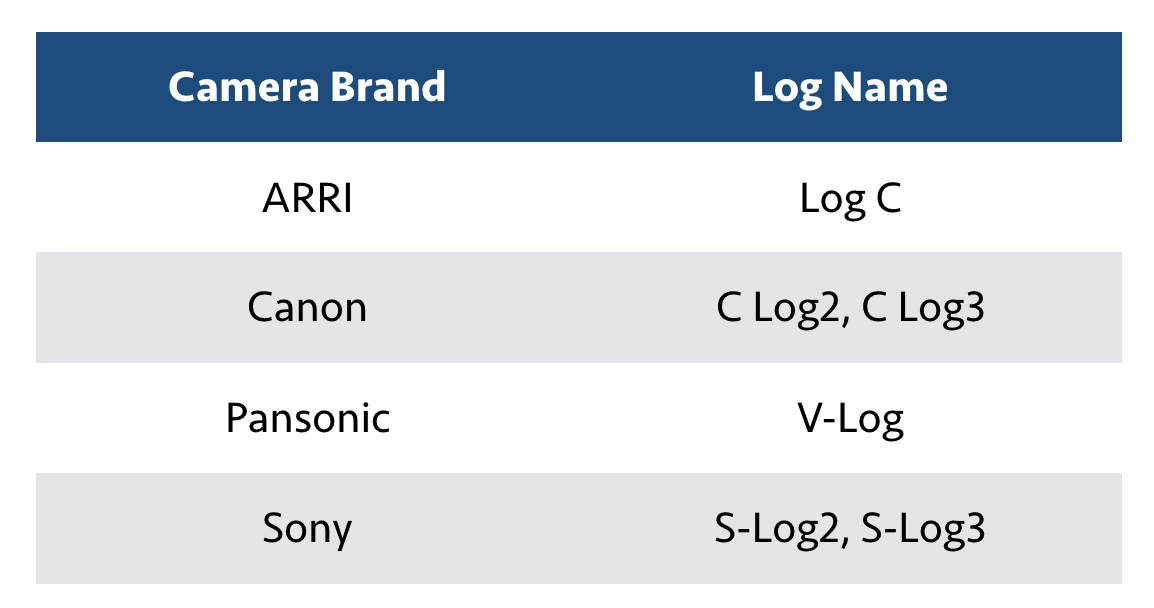
A different brand has a different name for this ‘log’ curve. Here is a list that allows you to find your match:  

Presented by Legolas

One huge advantage when shooting in ‘Log’ is that the information in both shadows and highlights can be both preserved, which allows you to capture a broader range of tones. Another advantage is wider color gamut. It will enable your image to be more vibrant and realistic. 

Most of our monitors are the REC.709 monitor. Thus the log video will look flat on those monitors. One important thing that you need to remember is that you have to color correct the footage to fit REC.709 before sharing it. The ‘3D LUT’ is designed to simplify this process. 

For those who do not want color correction but want even better footage, you could also achieve some decent cinematic looking by downloading creative LUTs and directly applied to the log footage you take. Just remember to download the correct log file that matches your camera. 

If you want to learn more about log and those terminologies,

· There is an excellent manual provided by Sony: http://assets.pro.sony.eu/Web/ngp/pdf/an-introduction-to-log-shooting.pdf
· And color FAQ by ARRI Camera that talks about ITU Rec 709, Rec 2020, Colour Gamut, 3D LUT: [ARRI Group: COLOR FAQ](http://www.arri.com/camera/alexa/learn/color_faq/)

How to reclaim your APFS space after removing bootcamp? by Legolas Wang

Thanks to Apple’s ‘Boot Camp Assistant’, install Windows 10 on Mac is usually a relatively easy and painless process. However, things seem to become much tricky when you want to remove the Bootcamp portion after High Sierra update. 

If you are like me, you want to delete BootCamp portion and reclaim all space for Mac again. Here is what you should do. 

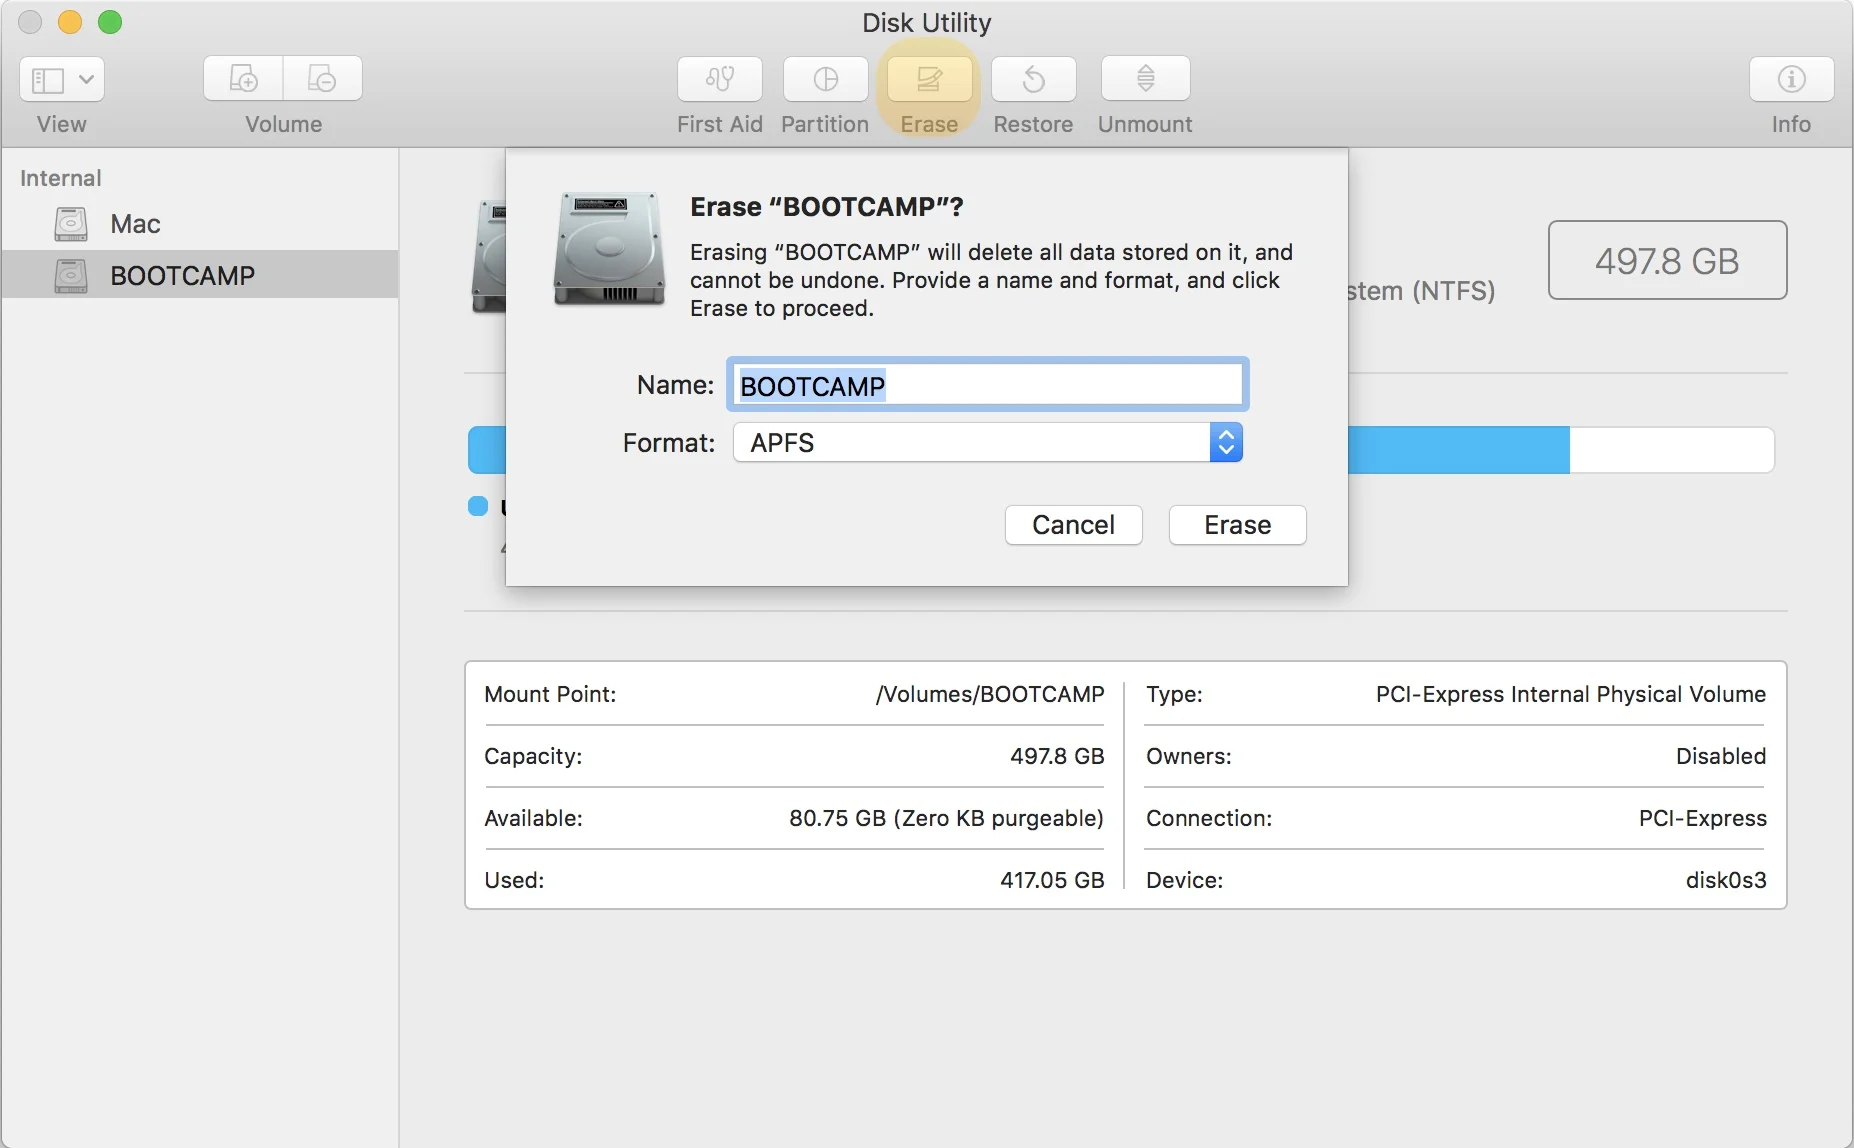
1. Start ‘Disk Utility’ app - Select ‘BOOTCAMP’ - Click ‘Erase’ button on the toolbar- Set the ‘Format’ to be ‘APFS’ - Click ‘Erase’ button on the popup. 

2. Start ‘Terminal’ app - Type in ‘diskutil list’. This command will display all disks on your Mac - Press ‘Return’ on your keyboard - You should see something like these - Write down the ‘IDENTIFIER’ of your ‘BOOTCAMP’ disk - Mine is ‘disk0s3’

3. Continue in ‘Terminal’ app - Type in ‘sudo diskutil eraseVolume free none disk0s3’. This command will free the space from the ‘BOOTCAMP’ disk - Press ‘Return’ on your keyboard - Wait until its finished
4. Continue in ‘Terminal’ app - Type in ‘sudo diskutil apfs resizeContainer disk0s2 0’. This command will reclaim all the free space to your currently Mac disk - Wait until its finished

That’s it! Now you’ll have a single Mac disk just like the day you purchased your Mac. 

Help Me Out. If you are afraid to do it yourself or don’t want to waste your time inline with the Apple Store, I can help you out with a small tip. Refer to ‘Service’ section for detail. 

Some thoughts about building this website by Legolas Wang

The reason for creating this website is to get things organized and recorded. 

Most of the contents here will be created & written by myself. I'll also collect pieces of articles, videos, software, etc., which I believe to be extraordinary. They will be recorded here for my future learning and reference. All of them will be well cited. 

The type of information could be various. From inspiring video clip, high quality & nicely-designed stuff to photography, software guides and developing knowledge. I wish to keep it minimal though.  

If you are a visitor and stuck with something that you think I can help. I can help you out with my knowledge of a small tip. Refer to 'Service' section on the website. 

All the best,

Legolas